1. Getting Started
-
Java Oracle JDK 8
-
IntelliJ / Eclipse
-
Maven (might be in IntelliJ)
2. Topic: Introducing Spring Boot
The trainer will introduce Spring Boot since we are going to work with it today. To have a clue is enough for this topic
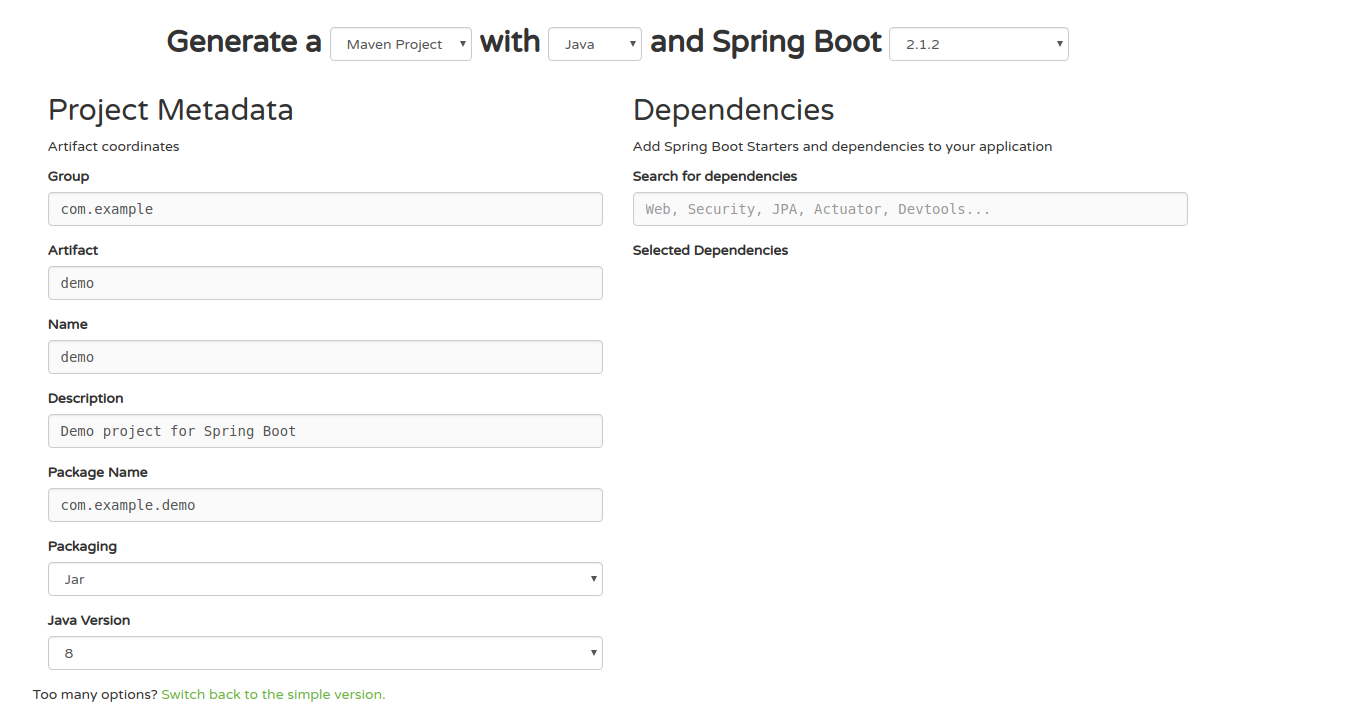
2.1. Assignment: Create an empty Spring Boot project
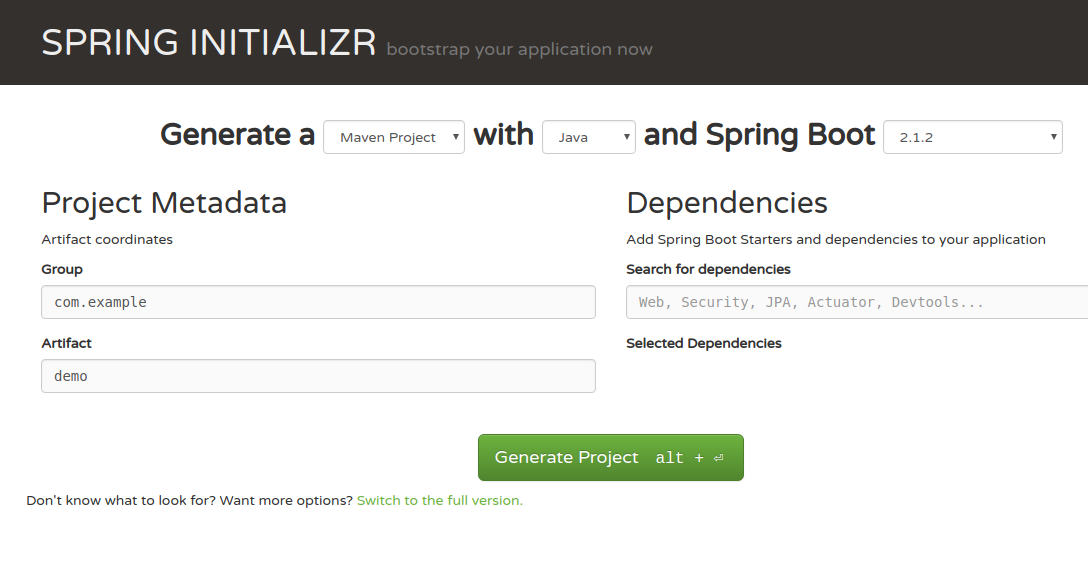
Click Switch to the full version
-
Group: nl.ing
-
Artifact: testing
-
Name: Testing Training
-
Description: This is for a description
-
Package name: nl.ing.testing
-
Packaging: jar
-
Java version: 8
-
Actuator
-
JPA
-
Spring Boot REST repositories
-
NOT JAX-RS
-
-
Web
-
Development Tools (DevTools)
-
H2 Database
| If you omit or forget one, no problem, we can fix that later! |
Below at the button click

to Download the zip file
Move the download zip file to a convenient location
| Convenient means handy to reach: so /Users/<username>/project is OK but C:\Program Files\Maven\bin\myprojects\v3.1.2\testing would be unwise :-) |
Unzip the file at that location
Enter the created directory!
$ mvn clean validate⇒ Should print BUILD SUCCESS
3. General
-
@Component
-
@Repository
-
@Service
-
@Configuration
-
@Controller
-
@RestController
-
-
-
@Autowired
4. Domain Objects
-
@Entity
-
@Id
-
@GeneratedValue
-
The existing query methods of the CrudRepository interface
-
The usage of adding a query method in the sub-interface e.g.
-
findWhereColor(Color c);
-
-
The adding of a JPQL query such as
-
@Query("SELECT u FROM User u WHERE u.status = 1") Collection<User> findAllActiveUsers();
-
-
Using native SQL such as
-
@Query( value = "SELECT * FROM USERS u WHERE u.status = 1", nativeQuery = true) Collection<User> findAllActiveUsersNative();
-
-
You loose the abstraction between your settings in application.properties file(s) where you can configure the spring.datasource…
-
You loose the competitence of your collegues which might not know or dislike native SQL
-
You loose the change of query syntax when somethings changes in your existing database SQL syntax
5. Repositories
-
@Repository
@Repository
public interface PersonReposity extends CrudRepository<Person, Long> {
        // That's it! :-)
}
6. REST
-
@RestController
-
@RequestMapping.???
-
@PostMapping
-
@GetMapping
-
@GetMapping("{id}")
@GetMapping
public ResponseEntity<Iterable<Person>> findAll() {
        return ResponseEntity.ok(this.service.findAll();
}@GetMapping("{id}")
public ResponseEntity<Person> findById(@PathVariable long id) {
return ResponseEntity.ok(this.service.findById(id));
}7. Service
-
@Service
-
@Transactional
The service of the service :-) is to contain the Business Logic.
-
@RestController: To receive the request and send the response
-
@Service: to do the complex business logic
-
@Repository: to save the data
If we would not have the @Service, where would we than place the business logic??? In the controller??? Bad idea; if we want to move away from REST and move to some other (in the future) the code of the @RestController would be full of business logic. In the @Repository, even badder: that is an interface and cannot and should not contain business logic since he is too busy with saving data.
@Service
//@Transactional => When you want (!) all your methods in a JTA Transaction (caution!!!)
public class PersonService {

        @Autowired
        private PersonRepository personRepository;

        @Transactional
        public Person save(Person p) {
                return this.personRepository.save(p);
        }

        public Iterable<Person> findAll() {
                return this.personRepository.findAll(); // not perse @Transactional here!
        }

}
7.1. Assignment: Service
To learn to create a service and to learn to wire the Service in your Controller and to know how to use the @Transactional annotation
During this assignment you will create a service, wire this service in to your controller and wire your existing repo in your service
So you get a middle layer between controller and repo which is the preferred way of working with Spring Boot
8. Creating your own components
@Component
public class MyComponent {

}| This component can now be used everywhere using the @Autowired annotation |
@Service
public class MyService {

        @Autowired
        private MyComponent myComponent;
}
8.1. Assignment: @Component
To create and wire your very first created Component
During this assignment you will create a BasicCalculator component which you you will wire in your service to perform some basic math operations like add, subtract, multiply and divide
-
Your service which you created in the previous assignment
-
You create a BasicCalculator
-
And make a Component of this BasicCalculator
-
And the BasicCalculator has the four basic math operations
-
And when I invoke the service method of the four basic math operations
-
The service asks the BasicCalculator for the result of the operations
-
And the result of the operations matches the expected result
| The service itself IS NOT ABLE TO DO THE MATH OPERATIONS ITSELF. It must delegate to the BasicCalculator Component |
9. @Bean and @Configuration
9.1. Using the @Configuration annotation
What if you want that some file which isn’t a component, not a service, not a repository want to be scanned by Spring?
For that purpose we luckily have the @Configuration annotation e.g. to make our beans in a class like shown below ⇒
9.2. Using the @Bean annotation
-
Coffee ⇒ Small code ⇒ Java Bean
-
Java EE, EJB ⇒ Enterprise Java Beans suck ⇒ Spring Beans rock ⇒ The term Bean is also used in Spring
In fact a Bean is a Component on steroids!
@Configuration // using the @Configuration here!!!
public class MyCoffeeBeans {


        @Bean
        public Person anne() {

                Person p = new Person();
                p.setFirstName("Anne");

                return p;

        }

        @Bean
        public Person will() {

                Person p = new Person();

                p.setName("Will");

                return p;

        }
}

// Both will and anne are now beans and can be wired like this

@Component
public class MyTeam {


        @Autowired
        private Person anne;

        @Autowired
        private Person will;

}| Nice isn’t it?! Both anne and will above are now injected in the MyTeam component |
| For this to work the class in which those @Bean is used must be annotated with some @Component (else Spring Boot will not look into the file) |
-
We use @Configuration to create a class which should be scanned by Spring Boot but is no Component, nor Service, nor Repository
-
We use @Bean to create a method which results in some objects ready for using in @Component’s
-
The name of the method is te name of the bean
-
The type of the method is the beanType
-
CAUTION: If you wire a class e.g. Person with a name in which there is no bean registered than the bean is wired by classType and you will get a default class
9.3. Assignment: @Bean
Learn how to create a @Bean
During this assignment you will create a team of Jeu de Boules players (3 persons)
-
Create a class MyTeam
-
Create a class Person
-
Create a class MyConfiguration
-
Wire the class MyTeam in your previously created Service
-
Invoke the service::printMyTeam
-
you invoke the method Service::printMyTeam
-
The names of the 3 (three) players of the jeu de boules team are printed
10. Logging
-
Levels
-
TRACE, DEBUG, INFO, WARN, ERROR, FATAL
-
10.1. Logging to console
-
Open application.properties
-
Add logging.level.<packagename>[.classname]=<LOGLEVEL>
-
Set ROOT loglevel
-
logging.level.=INFO
-
10.2. Logging to file
logging.file=/var/log/logfile.log
11. Topic: Spring Boot Profiles
11.1. Introduction
In the previous sections we worked with database (MySQL and / or H2). For the configuration of the database we used the application.properties file that contains the username and password.
What happens when there is some other environment??? (like acct or prod?)
11.2. What you will learn
-
Why and When to create a Spring Boot Profile
-
The principles behind Spring Boot Profile(s)
-
How to add a profile and how to work with it
11.3. Why and When: Spring Boot Profiles
When you have a per environment different config e.g. a different database or another server.port
11.4. How: Spring Boot Profiles
Spring Boot uses a very particular PropertySource order that is designed to allow sensible overriding of values.
-
Profile-specific application properties outside of your packaged jar (application-{profile}.properties and YAML variants).
-
Profile-specific application properties packaged inside your jar (application-{profile}.properties and YAML variants).
-
Application properties outside of your packaged jar (application.properties and YAML variants).
-
Application properties packaged inside your jar (application.properties and YAML variants). // rloman to me it seems that this ordering is incorrect or: The list is ordered by precedence (properties defined in locations higher in the list override those defined in lower locations).
-
@PropertySource annotations on your @Configuration classes.
-
Default properties (specified by setting SpringApplication.setDefaultProperties)
11.5. Summary: Spring Boot Profiles
-
src/main/resources/application.properties
-
src/main/resources/config/application.properties
-
after creating a jar using Maven
-
add application.properties in same dir as .jar file
-
-
Add a very default and mandatory part of the properties in src/main/resources/application.properties
-
create directory src/main/resources/config
-
add application.properties.example in this directory which contains some mandatory but per user settings (e.g. username and password for DB access
-
commit this application.properties.example file
-
.gitignore the rest of the src/main/resources/config/*
-
-
$ java -jar -Dspring.profiles.active=test myApp.jar
-
TIP: Be aware of the misleading order -jar and than the -D and than the jarfile (this might be confusing)
-
-
In Intellij set the environment variable spring.profiles.active
-
Set a value in a file called the same name as the .jar file but instead of ending with .jar end file .conf with the value JAVA_OPTS="-Dspring.profiles.active=prod" (see below)
-
Setting spring.profiles.active=<profileName> in your default application.properties
JAVA_OPTS="-Dspring.profiles.active=prod"| If a key is overridden by a later file (both files contains the same key) the last file read overwrites the key |
11.6. Further reading: Spring Boot Profiles
11.7. Assignment: Spring Boot Profiles
Learn how to create a profile
During this assignment you will create a test profile
-
Reading the code above
-
Implement the next assignment
-
I have a server running on port 8080 during development
-
I create a test environment
-
The server runs on port 8081