Release notes
-
Complete rewrite of the tutorial after implementing security for learninggoals UI part
-
Initial version
Introduction
What you will learn
-
The theory behind connecting an Angular UI to a Spring Boot Secure API
-
What a Guard in Angular is and how to use the CanActivateGuard class
-
-
Some technical and to security related topics
-
What localstorage is and how to work with it
-
How to send a jwt token using an Angular client
-
How to use the environment(s) of an Angular application
-
-
I prefer to use a roadmap and steps during this document
-
Roadmap: a coarse grained way to accomplish something
-
Steps: a fine grained way to accomplish something. These steps should be executed.
-
Start learning a secure UI
Topic: localStorage
Introduction
During this section we will learn what localStorage is.
What you will learn
-
What the localStorage on a browser is
-
How to handle it in JavaScript
-
How to handle it in Angular
Why: localStorage
Cookies are intended for communication with server; they are automatically added to all requests and can be accessed by both the server and client side.
Web storage falls exclusively under the purview of client-side scripting. Web storage data is not automatically transmitted to the server in every HTTP request, and a web server can’t directly write to Web storage. However, either of these effects can be achieved with explicit client-side scripts, allowing for fine-tuning of the desired interaction with the server.
What: localStorage
Web storage, sometimes known as DOM storage (Document Object Model storage), provides web apps with methods and protocols for storing client-side data.
Web storage supports persistent data storage, similar to cookies but with a greatly enhanced capacity and no information stored in the HTTP request header. There are two main web storage types: local storage and session storage, behaving similarly to persistent cookies and session cookies respectively.
Web storage is standardized by the World Wide Web Consortium (W3C). All major browsers support it.
How: localStorage
Web storage offers two different storage areas—local storage and session storage—which differ in scope and lifetime. Data placed in local storage is per origin—the combination of protocol, host name, and port number as defined in the same-origin policy.
The data is available to all scripts loaded from pages from the same origin that previously stored the data and persists after the browser is closed. As such, Web storage does not suffer from cookie Weak Integrity and Weak Confidentiality issues, described in RFC 6265 sections 8.5 and 8.6. Session storage is both per-origin and per-instance (per-window or per-tab) and is limited to the lifetime of the instance. Session storage is intended to allow separate instances of the same web app to run in different windows without interfering with each other, a use case that’s not well supported by cookies.
Follow-up: localStorage
Below you find for this topic some extra resources to read or watch
Topic: Fetch a JWT
Introduction
The first thing we have to learn is how we can get a JWT from the Spring Boot REST api.
What you will learn
-
How to perform a POST request to the auth endpoint of the Spring Boot api
Why: Fetch a JWT
The basics of a JWT is to have a token stored on the client side. The server is not even aware of the tokens it has send out. The Client has to store the token somewhere, which we will handle in the next section, and send the token with the subsequent requests. That is why we have to fetch a JWT from the server.
How: Fetch a JWT
-
Post to the auth endpoint
-
The JWT token will be received
-
We will send a request like this
-
POST http://localhost:8080/api/auth
-
body: { "username": "john doe", "password": "verysecretpassword"}
-
-
-
We will receive a response like this
-
body: { "token": "eyJhbGciOiJIUzUxMiJ9.eyJzd … "}
-
Topic: Store a JWT
Introduction
In the previous section we learned that we can store some in the localStorage. During this section we will learn how to store the JWT in the localStorage
What you will learn
-
How to handle the returned JWT
-
How to store the JWT in the localStorage
Why: Store a JWT
We have to store the JWT in localStorage to resend it will the subsequent requests
How: Store a JWT
  1
2
3
4
5
6
7
8
9
10
11
12
13
14
15
16
17
18
19
20
21
22
23
24
25
26
27
28
29
30
31
32
33
34
35
36
37
38
39
40
41
42
43
44
45
46
47
48
49
50
51
52
53
54
55
56
57
58
59
60

  import {Injectable} from '@angular/core';
import {environment} from "../../environments/environment";
import {HttpClient, HttpHeaders} from "@angular/common/http";
import {catchError, map, Observable, of} from "rxjs";
import {Token} from "../model/token";

@Injectable({
  providedIn: 'root'
})
export class AuthenticationService {
  private authUrl: string = environment.authUrl;  // URL to auth api

  constructor(private http: HttpClient) {

  }

  login(username: string, password: string): Observable<boolean> {
       let result:Observable<boolean> = this.http.post<Token>(this.authUrl+'/signin', { username: username, password: password })
      .pipe(map(tokenResult => {
          let token = tokenResult.tokenValue;
          if (token) {
            // store username and jwt token in local storage to keep user logged in between page refreshes
            localStorage.setItem('currentUser', JSON.stringify({ username: username, token: token }));

            // return true to indicate successful login
            return true;
          } else {
            // return false to indicate failed login
            return false;
          }
        }),
        catchError(err => {
          console.error(err);
          return of(false);
        }));

    return result;
  }

  getToken(): string {
    var currentUserString = localStorage.getItem('currentUser');
    if(!currentUserString) return "";

    var currentUser = JSON.parse(currentUserString)
    var token = currentUser && currentUser.token;


    return token ? token : "";
  }

  isLoggedIn(): boolean {
    var token: string = this.getToken();
    return token.length > 0;
  }

  logout(): void {
    // clear token remove user from local storage to log user out
    localStorage.removeItem('currentUser');
  }
}
-
On line 8 (?) we see that we use plain javascript to store the token in the localstorage. That’s all there is to it!
Topic: Http Interceptor
Introduction
In this section we will learn what the benefits are of using an Http Interceptor.
What you will learn
-
What an Http Interceptor is
-
Why we are going to use it
-
How to use it - in general terms
Why: Http Interceptor
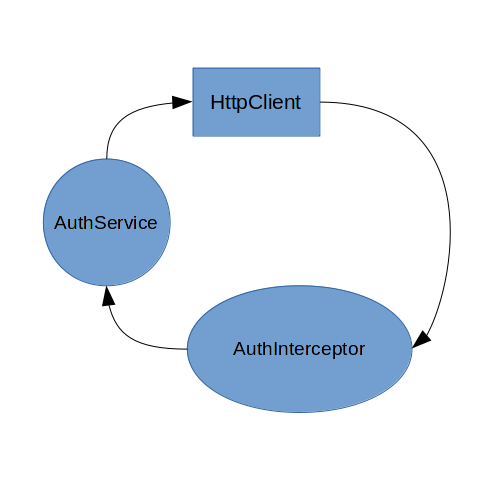
The goal of an Http Interceptor is to do some work after the request has been send out by the Angular Http Client. In fact it is some final PRE work before sending out the request to the Spring Boot REST api.
When: Http Interceptor
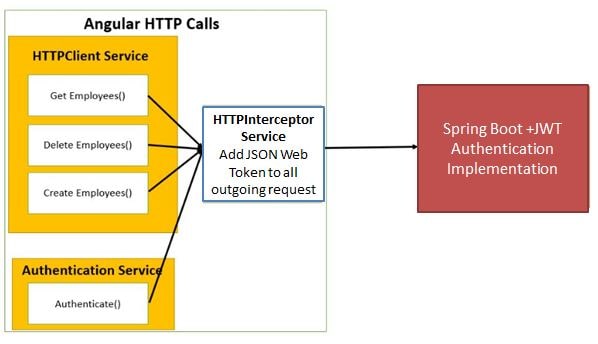
We can use the Http Interceptor in our case to add the Authorization header with the JWT to the request. So we do not have to add code to every service which is sending an Http Request. We can just add the Http Interceptor and every http call is led through the interceptor before it leaves our machine
What: Http Interceptor
An Http Interceptor is a class which implements the Angular HttpInterceptor interface, is registered in app.module.ts and will then run before(PRE) or after(POST) every http request.
How: Http Interceptor
-
Create a class AuthInterceptor which implements the HttpInterceptor interface
-
Implement the intercept(…) method
-
Register the interceptor
  1
2
3
4
5
6
7
8
9
10
11
12
13
14
15
16
17
18
19
20
21
22
23
24
25
26

  import {Injectable} from '@angular/core';
import {HttpEvent, HttpHandler, HttpInterceptor, HttpRequest} from '@angular/common/http';
import {Observable} from 'rxjs';
import {AuthenticationService} from "./services/authentication.service";

@Injectable()
export class AuthInterceptor implements HttpInterceptor {

  constructor(private authenticationService: AuthenticationService) {
  }

  intercept(req: HttpRequest<any>, next: HttpHandler): Observable<HttpEvent<any>> {
    if (this.authenticationService.isLoggedIn()) {
      let token: string = this.authenticationService.getToken();
      const cloneReq = req.clone({
        headers: req.headers.set(
          'Authorization',
          'Bearer ' + token
        )
      });
      return next.handle(cloneReq);
    } else {
      return next.handle(req);
    }
  }
}
  1
2
3
4
5
6
7
8
9
10
11
12
13
14
15
16
17
18
19
20
21
22
23
24
25
26
27
28
29
30
31
32
33
34
35

  import { NgModule } from '@angular/core';
import { BrowserModule } from '@angular/platform-browser';

import { AppRoutingModule } from './app-routing.module';
import { AppComponent } from './app.component';
import { DashboardComponent } from './components/dashboard/dashboard.component';
import { CarsComponent } from './components/cars/cars.component';
import { HomeComponent } from './components/home/home.component';
import { LoginComponent } from './components/login/login.component';
import {FormsModule} from "@angular/forms";
import { CarDetailComponent } from './components/car-detail/car-detail.component';
import {HTTP_INTERCEPTORS, HttpClientModule} from "@angular/common/http";
import {AuthInterceptor} from "./auth.interceptor";

@NgModule({
  declarations: [
    AppComponent,
    DashboardComponent,
    CarsComponent,
    HomeComponent,
    LoginComponent,
    CarDetailComponent
  ],
    imports: [
        BrowserModule,
        AppRoutingModule,
        FormsModule,
      HttpClientModule
    ],
  providers: [
    { provide: HTTP_INTERCEPTORS, useClass: AuthInterceptor, multi: true }
  ],
  bootstrap: [AppComponent]
})
export class AppModule { }
-
the multi above means, are there more than one entry in this JSON list
Follow-up: Http Interceptor
Below you find for this topic some extra resources to watch
Topic: CanActivate
Introduction
In this section we will introduce the principle regarding the Guards of Angular.
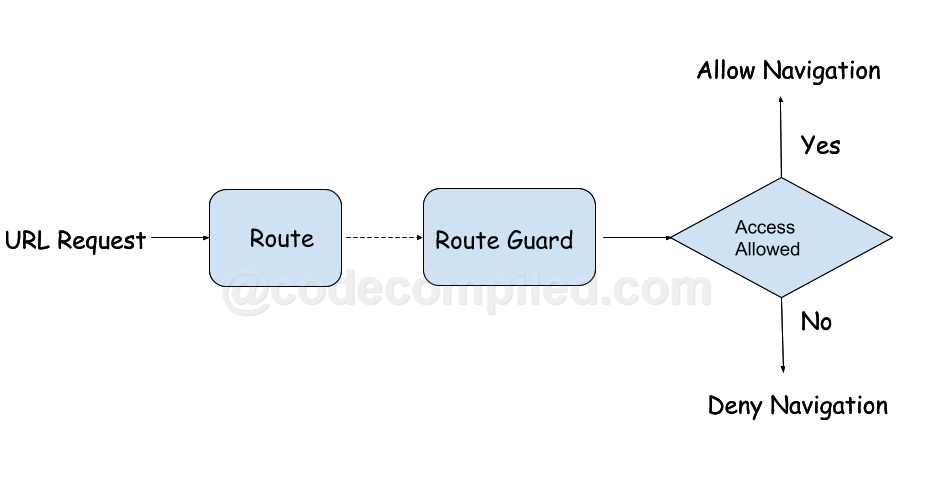
A guard in Angular is used to prevent a component from being loaded when the authorization dictates otherwise.
What you will learn
-
The principle of Angular guards
-
What the CanActivate guard can do for us
-
How to implement the CanActivate guard
Why and When: CanActivate
We can use a guard to prevent a component from being loaded
What: CanActivate
An canactivate guard in general in Angular is a class which implements the interface CanActivate and his method canActivate(…)
The canActivate method should return a boolean whether or not wrapped in an Observable or Promise.
If it returns true ⇒ the component on which the guard plumbed will be invoked If it returns false ⇒ the component on which the guard is not invoked AND the guard should navigate to a page which is different than the component e.g. login
How: CanActivate
Resources: CanActivate
Below you find for this topic some extra resources to watch and read
Topic: Environments
Introduction
In this section we will learn how to can use an Angular application in multiple environments, e.g. development, test, acceptance and production
| In Angular, the term environments in replaced by configurations since Angular 6+. |
What you will learn
-
Why we have multiple environments
-
How to use them
-
How to configure them in an Angular application
Please read this link carefully regarding configuration and also read this link regarding deployment
Topic: Send a JWT
Introduction
In the previous sections we learned how to fetch a JWT and to store a JWT. During this section you will learn how to get the stored JWT and send it with the request for getting data from the Spring Boot API.
What you will learn
-
How to get the stored JWT and put that in the request
Why: Send a JWT
We have to send out the JWT so that the Spring Boot REST api knows that we are legal to invoke an API call
What: Send a JWT
-
Read out the JWT from the localStorage
-
During sending add the Authorization header to the request which contains the JWT
-
'Authorization': 'Bearer eyJhbGciOiJIUzUxMiJ9.eyJz … '
-
How: Send a JWT
We implement a HttpInterceptor as shown in the theory above to the code. That will deliver the JWT per request
  1
2
3
4
5
6
7
8
9
10
11
12
13
14
15
16
17
18
19
20
21
22
23
24
25
26

  import {Injectable} from '@angular/core';
import {HttpEvent, HttpHandler, HttpInterceptor, HttpRequest} from '@angular/common/http';
import {Observable} from 'rxjs';
import {AuthenticationService} from "./services/authentication.service";

@Injectable()
export class AuthInterceptor implements HttpInterceptor {

  constructor(private authenticationService: AuthenticationService) {
  }

  intercept(req: HttpRequest<any>, next: HttpHandler): Observable<HttpEvent<any>> {
    if (this.authenticationService.isLoggedIn()) {
      let token: string = this.authenticationService.getToken();
      const cloneReq = req.clone({
        headers: req.headers.set(
          'Authorization',
          'Bearer ' + token
        )
      });
      return next.handle(cloneReq);
    } else {
      return next.handle(req);
    }
  }
}
Start implementing a secure UI
Overview
During the upcoming section we will implement the following structure, see image
Model related
Add class Authority
The goal of the class Authority is to model a class which contains the Authority
  1
2

  export class Authority {
}
Add class JwtUser
The goal of the class JwtUser is to model a class which contains the username and fullName and authorities of a given JwtUser.
  1
2
3
4
5
6
7
8

  import {Authority} from "./authority";

export class JwtUser {
  username: string | undefined;
  fullName:string | undefined;

  authorities: Authority[] | undefined
}
Angular Routing Related
Modify app-routing.module.ts
  1
2
3
4
5
6
7
8
9
10
11
12
13
14
15
16
17
18
19
20
21
22
23

  import { NgModule } from '@angular/core';
import { RouterModule, Routes } from '@angular/router';
import {LoginComponent} from "./components/login/login.component";
import {HomeComponent} from "./components/home/home.component";
import {DashboardComponent} from "./components/dashboard/dashboard.component";
import {CanActivateGuard} from "./guards/can-activate.guard";
import {CarDetailComponent} from "./components/car-detail/car-detail.component";
import {CarsComponent} from "./components/cars/cars.component";

const routes: Routes = [
  { path: '', redirectTo: '/home', pathMatch: 'full' },
  { path: 'login', component: LoginComponent},
  { path: 'home', component: HomeComponent },
  { path: 'dashboard', component: DashboardComponent, canActivate: [CanActivateGuard] },
  { path: 'cars/:id', component: CarDetailComponent, canActivate: [CanActivateGuard] },
  { path: 'cars', component: CarsComponent, canActivate: [CanActivateGuard] }
];

@NgModule({
  imports: [RouterModule.forRoot(routes)],
  exports: [RouterModule]
})
export class AppRoutingModule { }
Angular App related
Add to app.module.ts
-
Import Home and LoginComponent
-
Import AuthenticationService and CanActivateGuard
-
Add Home and LoginComponent to the declarations array
-
Add AuthencationService and CanActivateGuard to the providers array
  1
2
3
4
5
6
7
8
9
10
11
12
13
14
15
16
17
18
19
20
21
22
23

  import { NgModule } from '@angular/core';
import { RouterModule, Routes } from '@angular/router';
import {LoginComponent} from "./components/login/login.component";
import {HomeComponent} from "./components/home/home.component";
import {DashboardComponent} from "./components/dashboard/dashboard.component";
import {CanActivateGuard} from "./guards/can-activate.guard";
import {CarDetailComponent} from "./components/car-detail/car-detail.component";
import {CarsComponent} from "./components/cars/cars.component";

const routes: Routes = [
  { path: '', redirectTo: '/home', pathMatch: 'full' },
  { path: 'login', component: LoginComponent},
  { path: 'home', component: HomeComponent },
  { path: 'dashboard', component: DashboardComponent, canActivate: [CanActivateGuard] },
  { path: 'cars/:id', component: CarDetailComponent, canActivate: [CanActivateGuard] },
  { path: 'cars', component: CarsComponent, canActivate: [CanActivateGuard] }
];

@NgModule({
  imports: [RouterModule.forRoot(routes)],
  exports: [RouterModule]
})
export class AppRoutingModule { }
Component related
Modify app.component.html
  1

  <router-outlet></router-outlet>
Modify the other components
Modify dashboard.component.ts
-
Add router to constructor
-
Expand ngOnInit
  1
2
3
4
5
6
7
8
9
10
11
12
13
14
15
16
17
18
19
20

  import { Component, OnInit } from '@angular/core';
import {Car} from "../../model/car";
import {Router} from "@angular/router";
import {CarService} from "../../services/car.service";

@Component({
  selector: 'app-dashboard',
  templateUrl: './dashboard.component.html',
  styleUrls: ['./dashboard.component.css']
})
export class DashboardComponent implements OnInit {
  cars: Car[] = [];

  constructor(private router: Router, private carService: CarService) {
  }

  ngOnInit(): void {
    this.carService.getCars().subscribe(cars => this.cars = cars);
  }
}
Modify our applications component.ts
-
getHeroes method is extended with an error callback handler
  1
2
3
4
5
6
7
8
9
10
11
12
13
14
15
16
17
18
19
20
21
22
23
24
25
26
27
28
29
30
31
32
33
34
35
36
37
38
39
40
41
42
43
44
45
46
47
48
49
50
51

  import { Component, OnInit } from '@angular/core';
import {Car} from "../../model/car";
import {Router} from "@angular/router";
import {CarService} from "../../services/car.service";
import {Observable} from "rxjs";

@Component({
  selector: 'app-cars',
  templateUrl: './cars.component.html',
  styleUrls: ['./cars.component.css']
})
export class CarsComponent  {

  selectedCar: Car | undefined | null;

  constructor(private router: Router, private carService: CarService){ }

  public cars$: Observable<Car[] | null> = this.carService.getCars();

  onSelect(car: Car): void {
    this.selectedCar = car;
  }

  gotoDetail(): void {
    this.router.navigate(['/detail', this.selectedCar?.id]);
  }

  /*
  add(name: string): void {
    name = name.trim();
    if(name) {
      this.carService.create(name).subscribe(car => {
          this.cars?.push(car);
          this.selectedCar = null;
        });
    }
  }

  delete(car: Car): void {
    if(!car.id) return;
    this.carService
      .delete(car.id).subscribe((h) => {
      this.cars = this.cars?.filter(h => h !== car);
      if(this.selectedCar === car) {
        this.selectedCar = null;
      }
    })
  }

   */
}
Add home.component.ts
  1
2
3
4
5
6
7
8
9
10
11
12
13
14
15

  import { Component, OnInit } from '@angular/core';

@Component({
  selector: 'app-home',
  templateUrl: './home.component.html',
  styleUrls: ['./home.component.css']
})
export class HomeComponent implements OnInit {

  constructor() { }

  ngOnInit(): void {
  }

}
Add login.component.css
  1
2
3
4
5
6
7
8
9
10
11
12
13
14
15
16
17
18
19
20
21
22
23
24
25
26
27
28

  .alert {
  width:200px;
  margin-top:20px;
  margin-bottom:20px;
}

.alert.alert-info {
  color:#607D8B;
}

.alert.alert-error {
  color:red;
}

.help-block {
  width:200px;
  color:white;
  background-color:gray;
}

.form-control {
  width: 200px;
  margin-bottom:10px;
}

.btn {
  margin-top:20px;
}
Add login.component.html
1
2
3
4
5
6
7
8
9
10
11
12
13
14
15
16
17
18
19
20
21
22
23
24
25
26
<div class="col-md-6 col-md-offset-3">
<h2>Login</h2>
<div class="alert alert-info">
Username: {{ this.model.username }} <br>
Password: {{ this.model.password }}
</div>
<form name="form" (ngSubmit)="f.form.valid && login()" #f="ngForm" novalidate>
<div class="form-group" [ngClass]="{ 'has-error': f.submitted && !username.valid }">
<label for="username">Username</label>
<input type="text" class="form-control" name="username" id="username"[(ngModel)]="model.username" #username="ngModel" required />
<span *ngIf="f.submitted && !username.valid" class="help-block">Username is required</span>
</div>
<div class="form-group" [ngClass]="{ 'has-error': f.submitted && !password.valid }">
<label for="password">Password </label>
<input type="password" class="form-control" id="password" name="password" [(ngModel)]="model.password" #password="ngModel" required />
<span *ngIf="f.submitted && !password.valid" class="help-block">Password is required</span>
</div>
<div class="form-group">
<button [disabled]="loading" class="btn btn-primary">Login</button>
<img *ngIf="loading" src="data:image/gif;base64,R0lGODlhEAAQAPIAAP///wAAAMLCwkJCQgAAAGJiYoKCgpKSkiH/C05FVFNDQVBFMi4wAwEAAAAh/hpDcmVhdGVkIHdpdGggYWpheGxvYWQuaW5mbwAh+QQJCgAAACwAAAAAEAAQAAADMwi63P4wyklrE2MIOggZnAdOmGYJRbExwroUmcG2LmDEwnHQLVsYOd2mBzkYDAdKa+dIAAAh+QQJCgAAACwAAAAAEAAQAAADNAi63P5OjCEgG4QMu7DmikRxQlFUYDEZIGBMRVsaqHwctXXf7WEYB4Ag1xjihkMZsiUkKhIAIfkECQoAAAAsAAAAABAAEAAAAzYIujIjK8pByJDMlFYvBoVjHA70GU7xSUJhmKtwHPAKzLO9HMaoKwJZ7Rf8AYPDDzKpZBqfvwQAIfkECQoAAAAsAAAAABAAEAAAAzMIumIlK8oyhpHsnFZfhYumCYUhDAQxRIdhHBGqRoKw0R8DYlJd8z0fMDgsGo/IpHI5TAAAIfkECQoAAAAsAAAAABAAEAAAAzIIunInK0rnZBTwGPNMgQwmdsNgXGJUlIWEuR5oWUIpz8pAEAMe6TwfwyYsGo/IpFKSAAAh+QQJCgAAACwAAAAAEAAQAAADMwi6IMKQORfjdOe82p4wGccc4CEuQradylesojEMBgsUc2G7sDX3lQGBMLAJibufbSlKAAAh+QQJCgAAACwAAAAAEAAQAAADMgi63P7wCRHZnFVdmgHu2nFwlWCI3WGc3TSWhUFGxTAUkGCbtgENBMJAEJsxgMLWzpEAACH5BAkKAAAALAAAAAAQABAAAAMyCLrc/jDKSatlQtScKdceCAjDII7HcQ4EMTCpyrCuUBjCYRgHVtqlAiB1YhiCnlsRkAAAOwAAAAAAAAAAAA==" />
</div>
<div *ngIf="error" class="alert alert-error">{{error}}</div>
</form>
</div>
Add login.component.ts
  1
2
3
4
5
6
7
8
9
10
11
12
13
14
15
16
17
18
19
20
21
22
23
24
25
26
27
28
29
30
31
32
33
34
35
36
37
38
39
40
41
42

  import { Component, OnInit } from '@angular/core';
import {Router} from "@angular/router";
import {AuthenticationService} from "../../services/authentication.service";

@Component({
  selector: 'app-login',
  templateUrl: './login.component.html',
  styleUrls: ['./login.component.css']
})
export class LoginComponent implements OnInit {
  model: any = {};
  loading = false;
  error = '';

  constructor(
    private router: Router,
    private authenticationService: AuthenticationService) { }

  ngOnInit() {
    // reset login status
    this.authenticationService.logout();
  }

  login() {
    this.loading = true;
    this.authenticationService.logout();
    this.authenticationService.login(this.model.username, this.model.password)
      .subscribe(result => {
        if (result === true) {
          // login successful
          this.router.navigate(['home']);
        } else {
          // login failed
          this.error = 'Username or password is incorrect';
          this.loading = false;
        }
      }, error => {
        this.loading = false;
        this.error = error;
      });
  }
}
Service Related
  1
2
3
4
5
6
7
8
9
10
11
12
13
14
15
16
17
18
19
20
21
22
23
24
25
26
27
28
29
30
31
32
33
34
35
36
37
38
39
40
41
42
43
44
45
46
47
48
49
50
51
52
53
54
55
56
57
58
59
60

  import {Injectable} from '@angular/core';
import {environment} from "../../environments/environment";
import {HttpClient, HttpHeaders} from "@angular/common/http";
import {catchError, map, Observable, of} from "rxjs";
import {Token} from "../model/token";

@Injectable({
  providedIn: 'root'
})
export class AuthenticationService {
  private authUrl: string = environment.authUrl;  // URL to auth api

  constructor(private http: HttpClient) {

  }

  login(username: string, password: string): Observable<boolean> {
       let result:Observable<boolean> = this.http.post<Token>(this.authUrl+'/signin', { username: username, password: password })
      .pipe(map(tokenResult => {
          let token = tokenResult.tokenValue;
          if (token) {
            // store username and jwt token in local storage to keep user logged in between page refreshes
            localStorage.setItem('currentUser', JSON.stringify({ username: username, token: token }));

            // return true to indicate successful login
            return true;
          } else {
            // return false to indicate failed login
            return false;
          }
        }),
        catchError(err => {
          console.error(err);
          return of(false);
        }));

    return result;
  }

  getToken(): string {
    var currentUserString = localStorage.getItem('currentUser');
    if(!currentUserString) return "";

    var currentUser = JSON.parse(currentUserString)
    var token = currentUser && currentUser.token;


    return token ? token : "";
  }

  isLoggedIn(): boolean {
    var token: string = this.getToken();
    return token.length > 0;
  }

  logout(): void {
    // clear token remove user from local storage to log user out
    localStorage.removeItem('currentUser');
  }
}
$ ng generate service authentication-
In the login method above there is a post which will post the username and password to the REST api for validation
-
If successful ⇒ We use the pipe method to pipe the returned Observable through a pipe and map the tokenResult (WebResult) to a String. That string is than persisted to localStorage
-
If not successful ⇒ We just return false to indicate a failed login
Security related
Add CanActivateGuard
  1
2
3
4
5
6
7
8
9
10
11
12
13
14
15
16
17
18
19
20
21
22
23
24
25
26
27

  import {Injectable} from '@angular/core';
import {ActivatedRouteSnapshot, CanActivate, Router, RouterStateSnapshot, UrlTree} from '@angular/router';
import {Observable} from 'rxjs';
import {AuthenticationService} from "../services/authentication.service";

@Injectable({
  providedIn: 'root'
})
export class CanActivateGuard implements CanActivate {
  constructor(
    private router: Router,
    private authenticationService: AuthenticationService) {
  }

  canActivate(
    next: ActivatedRouteSnapshot,
    state: RouterStateSnapshot): Observable<boolean> | Promise<boolean> | boolean {

    if (this.authenticationService.isLoggedIn()) {
      return true;
    } else {
      this.router.navigate(['/login']);
      return false;
    }
  }

}
  1

          $ ng generate guard can-activate
Add class AuthInterceptor
  1
2
3
4
5
6
7
8
9
10
11
12
13
14
15
16
17
18
19
20
21
22
23
24
25
26

  import {Injectable} from '@angular/core';
import {HttpEvent, HttpHandler, HttpInterceptor, HttpRequest} from '@angular/common/http';
import {Observable} from 'rxjs';
import {AuthenticationService} from "./services/authentication.service";

@Injectable()
export class AuthInterceptor implements HttpInterceptor {

  constructor(private authenticationService: AuthenticationService) {
  }

  intercept(req: HttpRequest<any>, next: HttpHandler): Observable<HttpEvent<any>> {
    if (this.authenticationService.isLoggedIn()) {
      let token: string = this.authenticationService.getToken();
      const cloneReq = req.clone({
        headers: req.headers.set(
          'Authorization',
          'Bearer ' + token
        )
      });
      return next.handle(cloneReq);
    } else {
      return next.handle(req);
    }
  }
}
Resources
-
The first useful link is the location where I found it all!
-
This is based on the Angular tutorial
-
Source on Github
-